
The checkerboard table. Fun for the whole family, but make no promises as to when this project will be completed.
Okay, okay. I admit I move slowly in the summer. Turtle slow. Any “side” project without a deadline gets put aside so I can meet more immediate needs: running my business, weeding the garden, driving the kids somewhere, writing/revising, making meals, playing Bubble Pop… Then once school starts and the teaching schedule hits full force, I’m lucky if I can scratch out fifteen consecutive minutes to take a shower, let alone work on something non-essential.
Which is why that great light-bulb-moment idea I had in July to turn my square coffee table into a checkerboard took me nearly three months to complete. Truly the only reason I finished is because I needed to clear out the work space in the garage in order to park the van. Once the weather cools all the trees in my yard start vomiting leaves and berries and sap and acorns. Anything left out in the driveway is quickly doused with an autumn explosion of sticky. Starting in October, I had to scrub wipe down my van’s windows before I could see through them to drive. This ten minute morning ritual served as a nice reminder that I needed to get that #$^%!* (special) project done.
So here is my little table painting project, in picture steps, just in case you ever have a square table and some time on your hands. I’m sure you’ll finish much faster than I did.
Step 1: Sand the table so it’s as smooth as . . . [insert appropriate noun here].
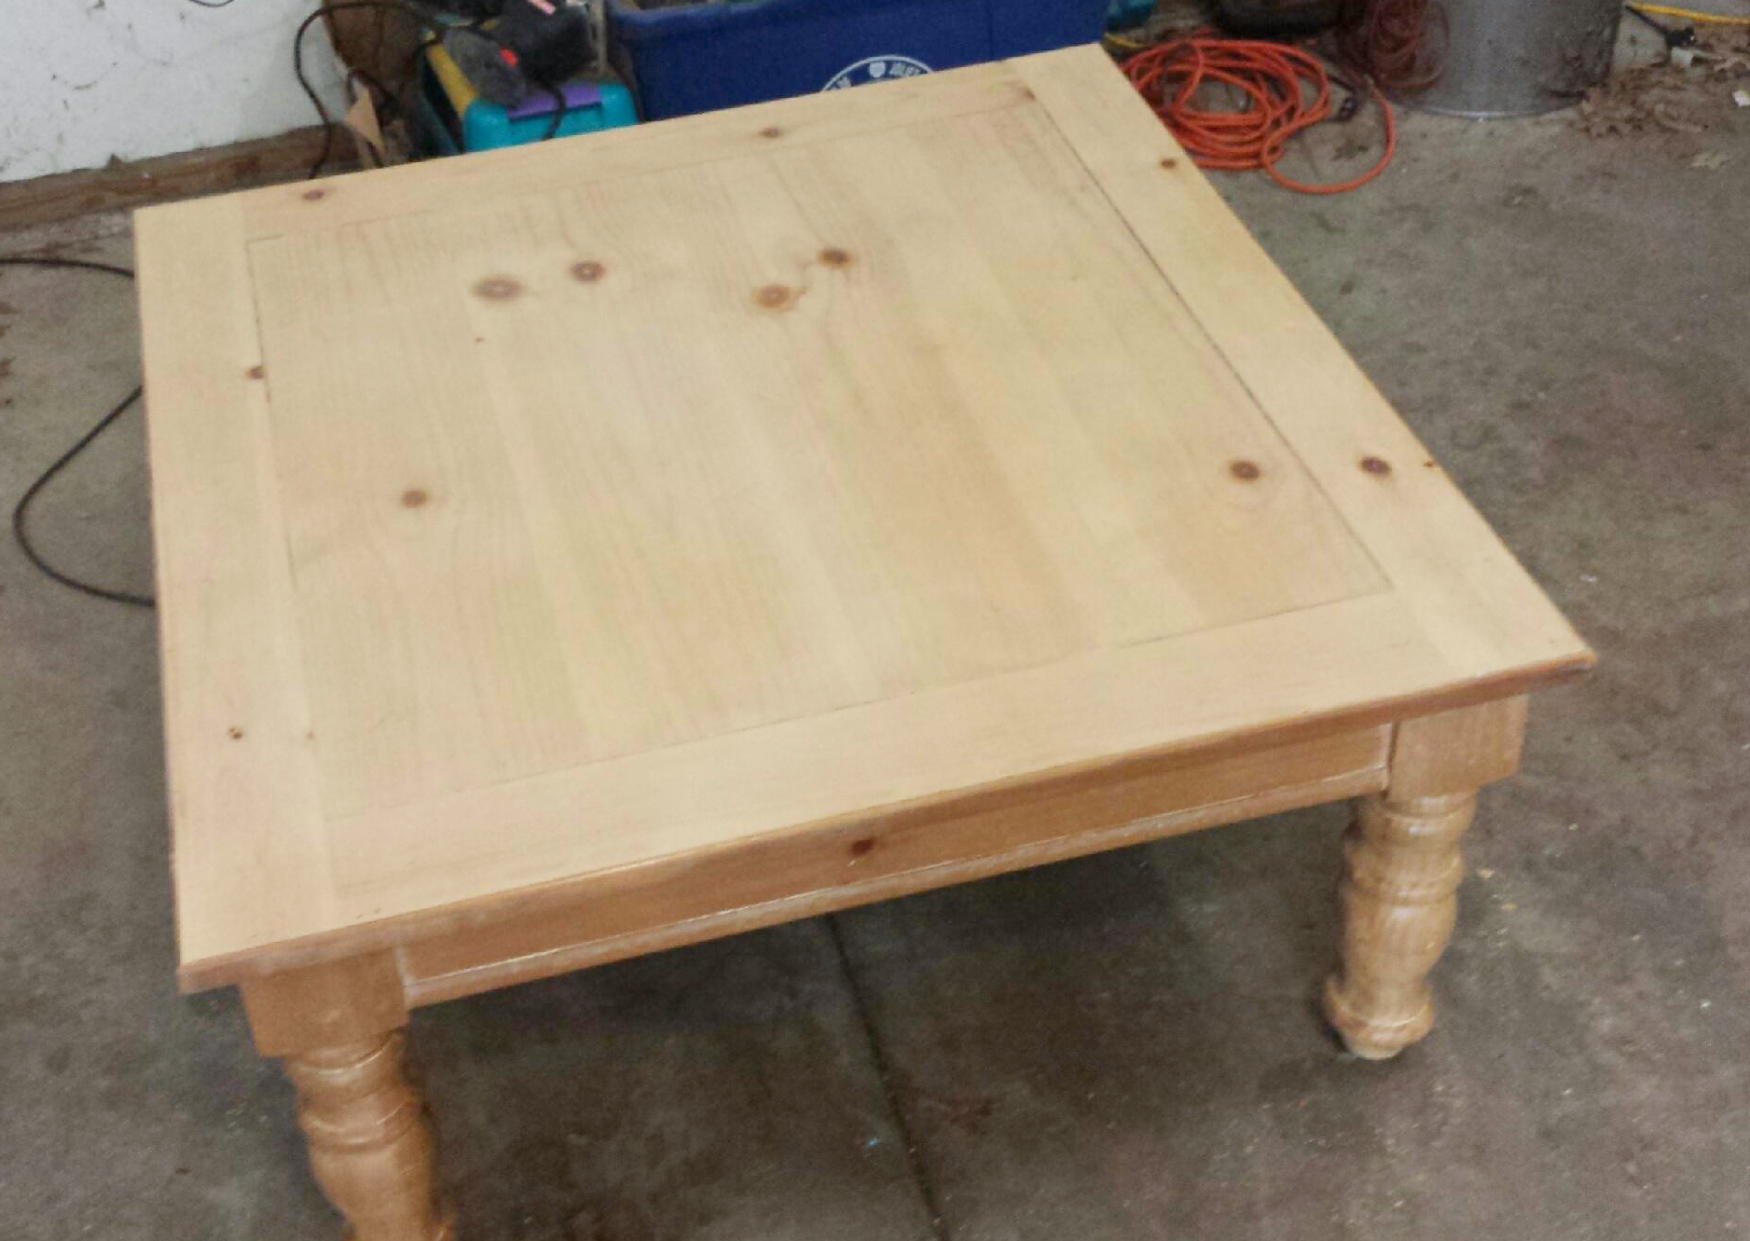
The square table, once covered with child graffiti, now sanded to pristine perfection.
Step 2: Using painter’s tape, mask off a border. My table had a built-in border with a groove, so I masked to the inside edge of the groove.
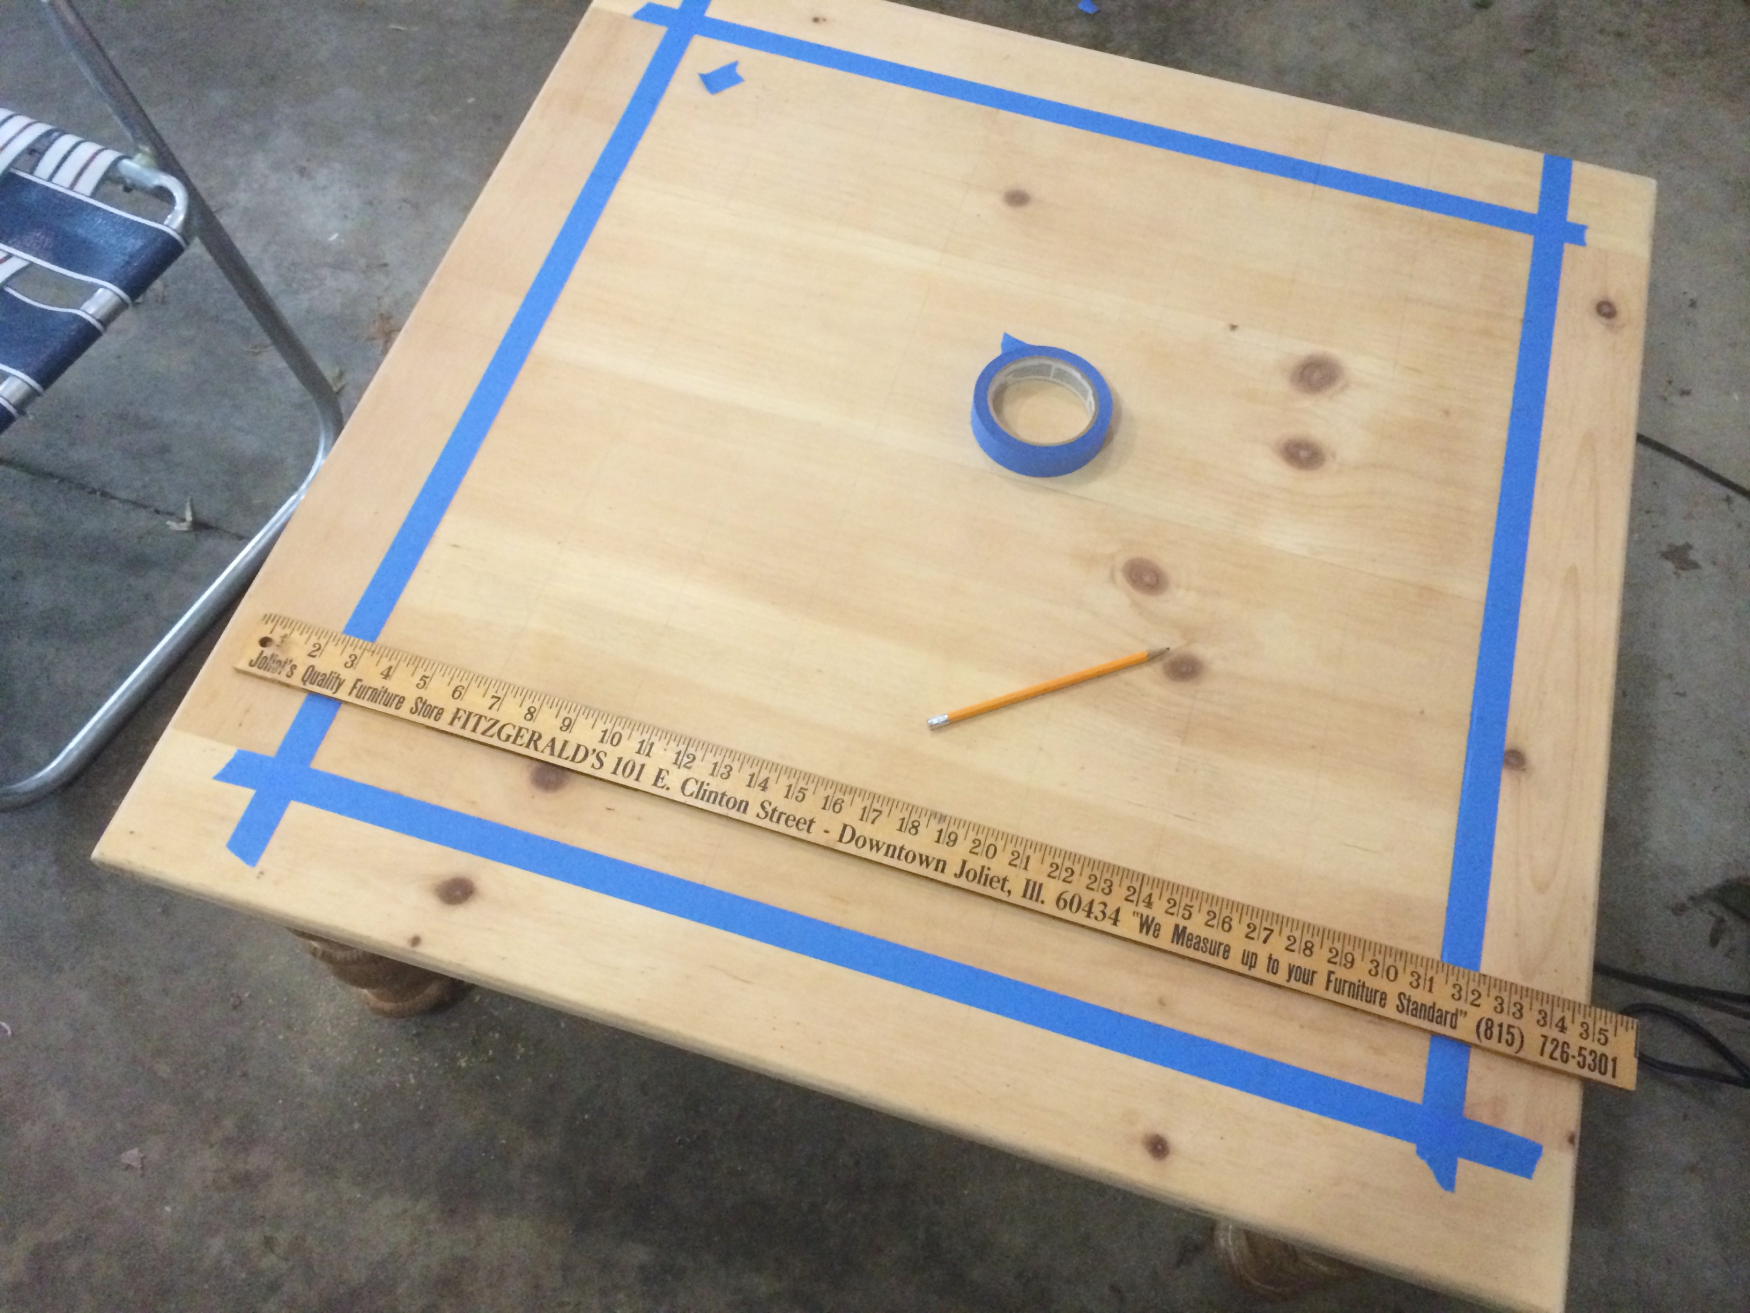
Blue painter’s tape is magic on a cardboard roll. Use it to create clean, straight paint edges.
Step 3: A standard checkerboard is eight by eight squares. The size you choose for your squares will depend on the size of your table. In a perfect world the size of your table will evenly divide by eight. Mine didn’t. It was off by about 1/4″. So I found the center point of the table and with a yard stick and a pencil I divided the table into quadrants, then split those in half, and then half again. As a result my center squares are just a little bit smaller than the ones around the edges, but the difference is so small, no one but you and I will ever know.
Note to self: Pine wood is soft. Don’t press too hard when drawing lines with a pencil as gouges may result. More cursing sanding will ensue.
Step 4: Now here is where I used a lot of painter’s tape. I placed the outside edge of the tape on the outside of what would be the red squares in the first, third, fifth, and seventh columns. To remind myself which squares I planned on painting I marked them with a scrap of tape.

Press the tape down securely so the paint doesn’t seep underneath and ruin your edges.
Step 5: I painted three coats of red, drying at least two hours (to two weeks) between coats. I used a flat finish water-based paint with primer already in the mix. I cleaned the paint brush after each coat (with soap and water) and made sure the paint brush was completely dry before proceeding to the next coat.
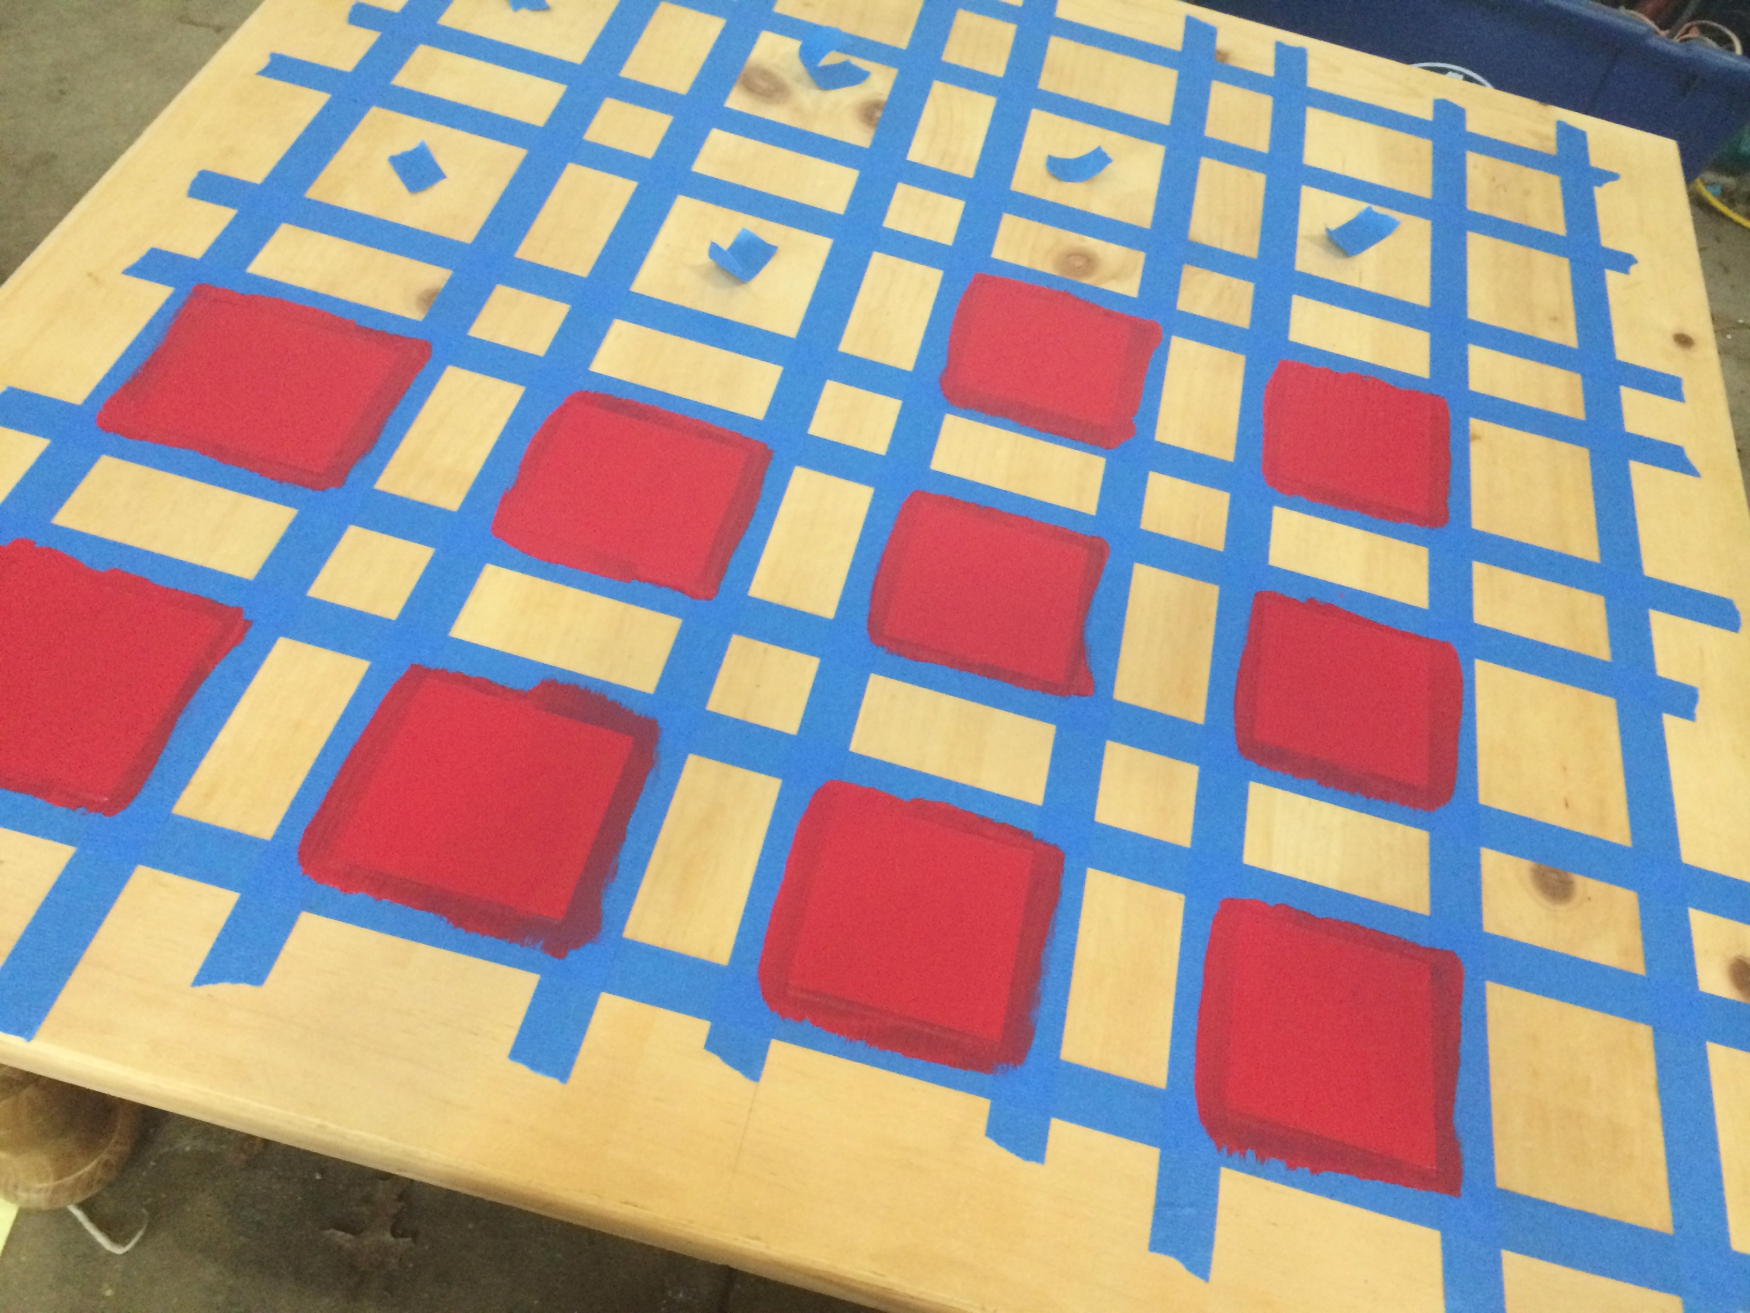
Only paint the perfect squares (marked with a scrap of blue tape–pull off the scraps as you paint).
Step 6: When the first set of red squares was finished, I removed the taped edges. Then, I taped again on the outside edge of what would be the red squares running in the second, fourth, sixth, and eighth columns. I repeated the entire process: painting three coats of red, cleaning up and drying between coats. After the last coat of red dried, I removed all the tape, except the outside border (see below).

It’s September and the red squares are done!
Step 7: Now on to the black. I used a flat finish water-based paint and repeated the taping/painting process for the black squares making sure I taped the outside edge each time. I painted the even columns of black squares first, and then the odd. Three coats were used for each square.
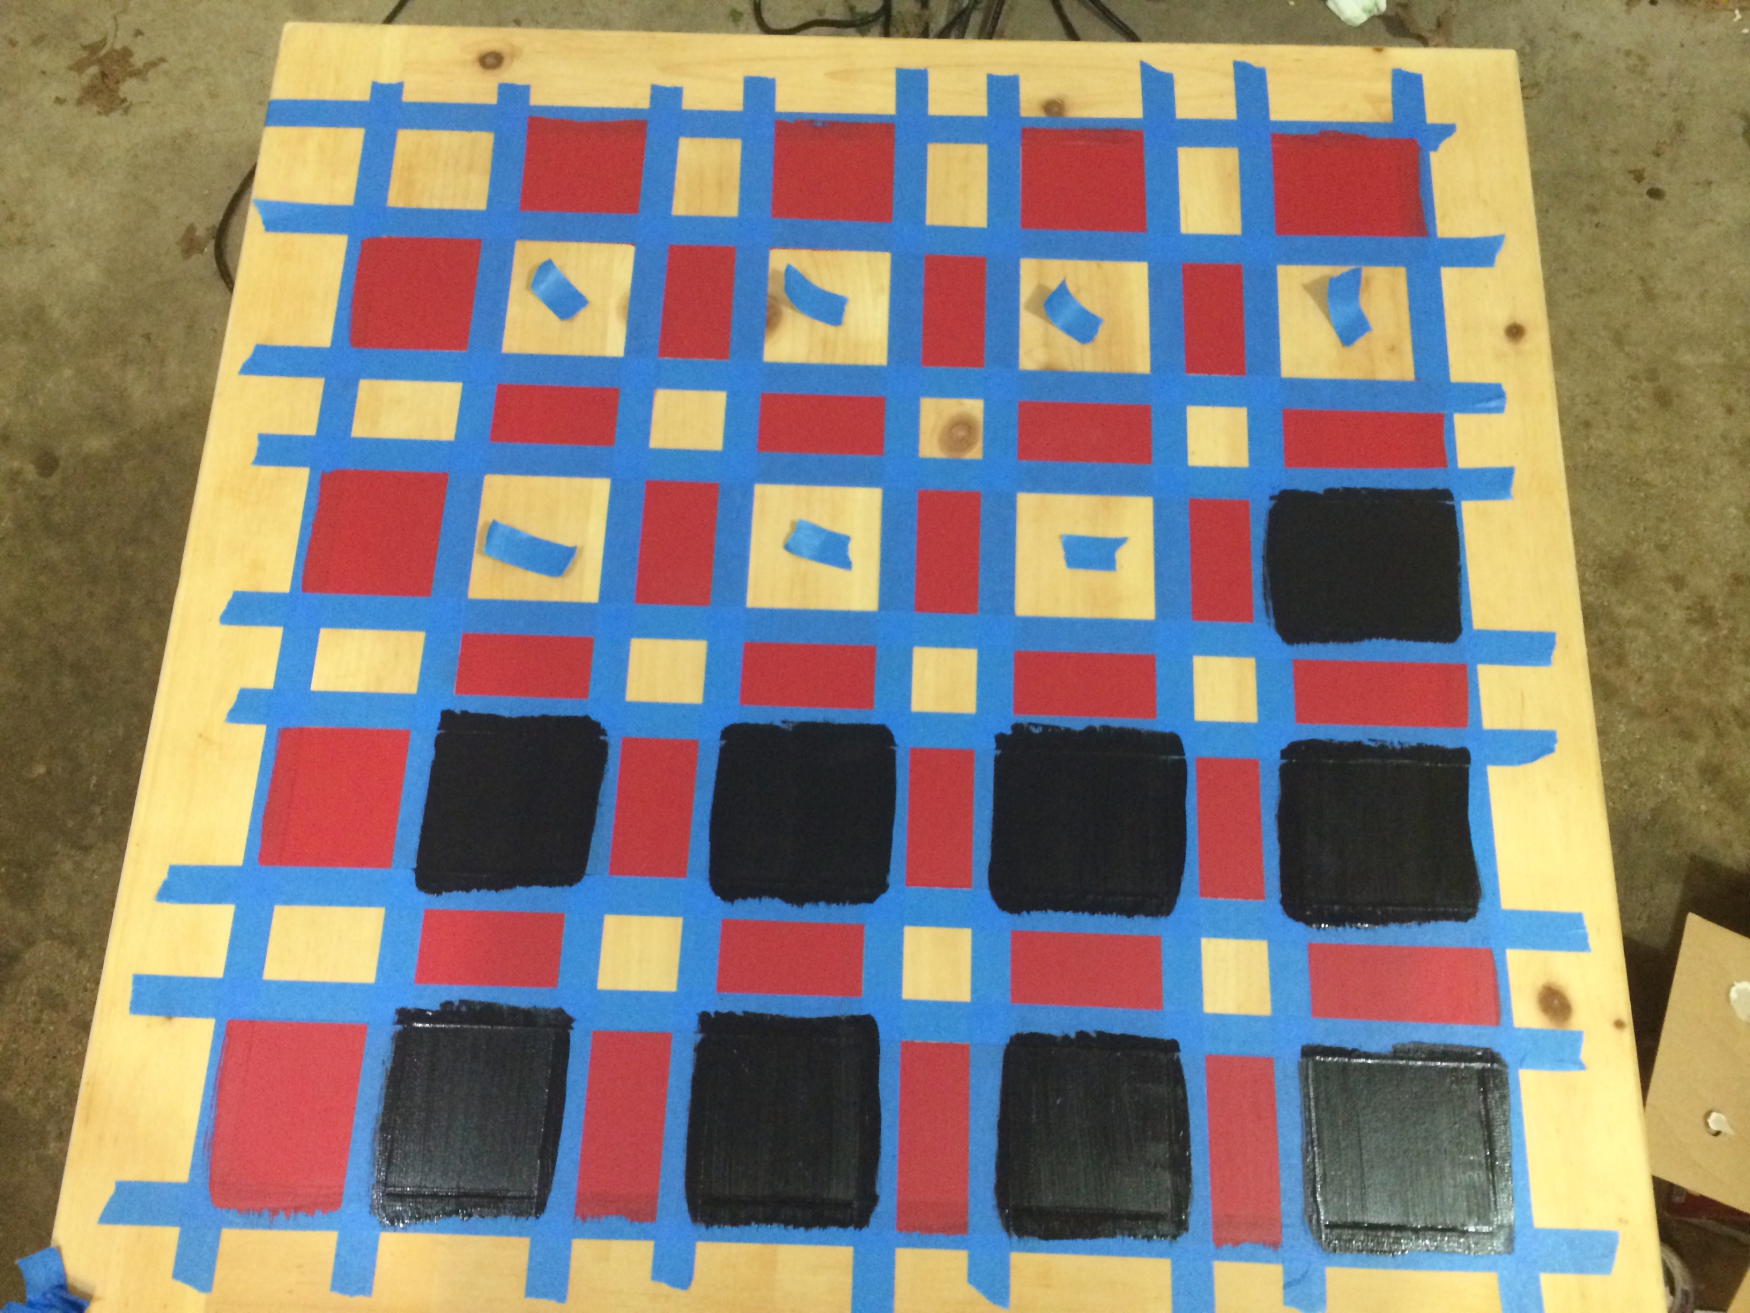
When painting, always have your brush strokes go in the same direction as the grain of the wood.
Step 8: After the last coat of black dried, I removed all the tape, except the outside border. Using a yard stick and a black permanent marker (medium chiseled edge Sharpie) I smoothed any rough edges caused by paint seeping underneath the tape.

When the black squares are done, remove the tape. Tidy edges with a black permanent marker.
Note to self: If you leave your project in the garage for more than a month, household members will start putting things on top of it, including the remote control for the TV in the garage. Any flat surface is at risk.
Step 9: I removed the inside border tape and re-taped the outside of the border to protect the red/black grid. Then I painted the border. I used three coats of black.
Step 10: I painted a thin line of silver metallic craft paint into the groove on the inside edge of the border. I used three coats of the silver, a small, thin paint brush, and a steady hand.
Step 11: I applied six coats of a flat polyurethane, drying between coats, lightly sanding with steel wool between the third and fourth coats. I let the last coat of polyurethane cure for one week and brought the table into the house.
Next up, the winter project. Sewing and stuffing red and black checkers. Six red checkers done . . . check back in three months.
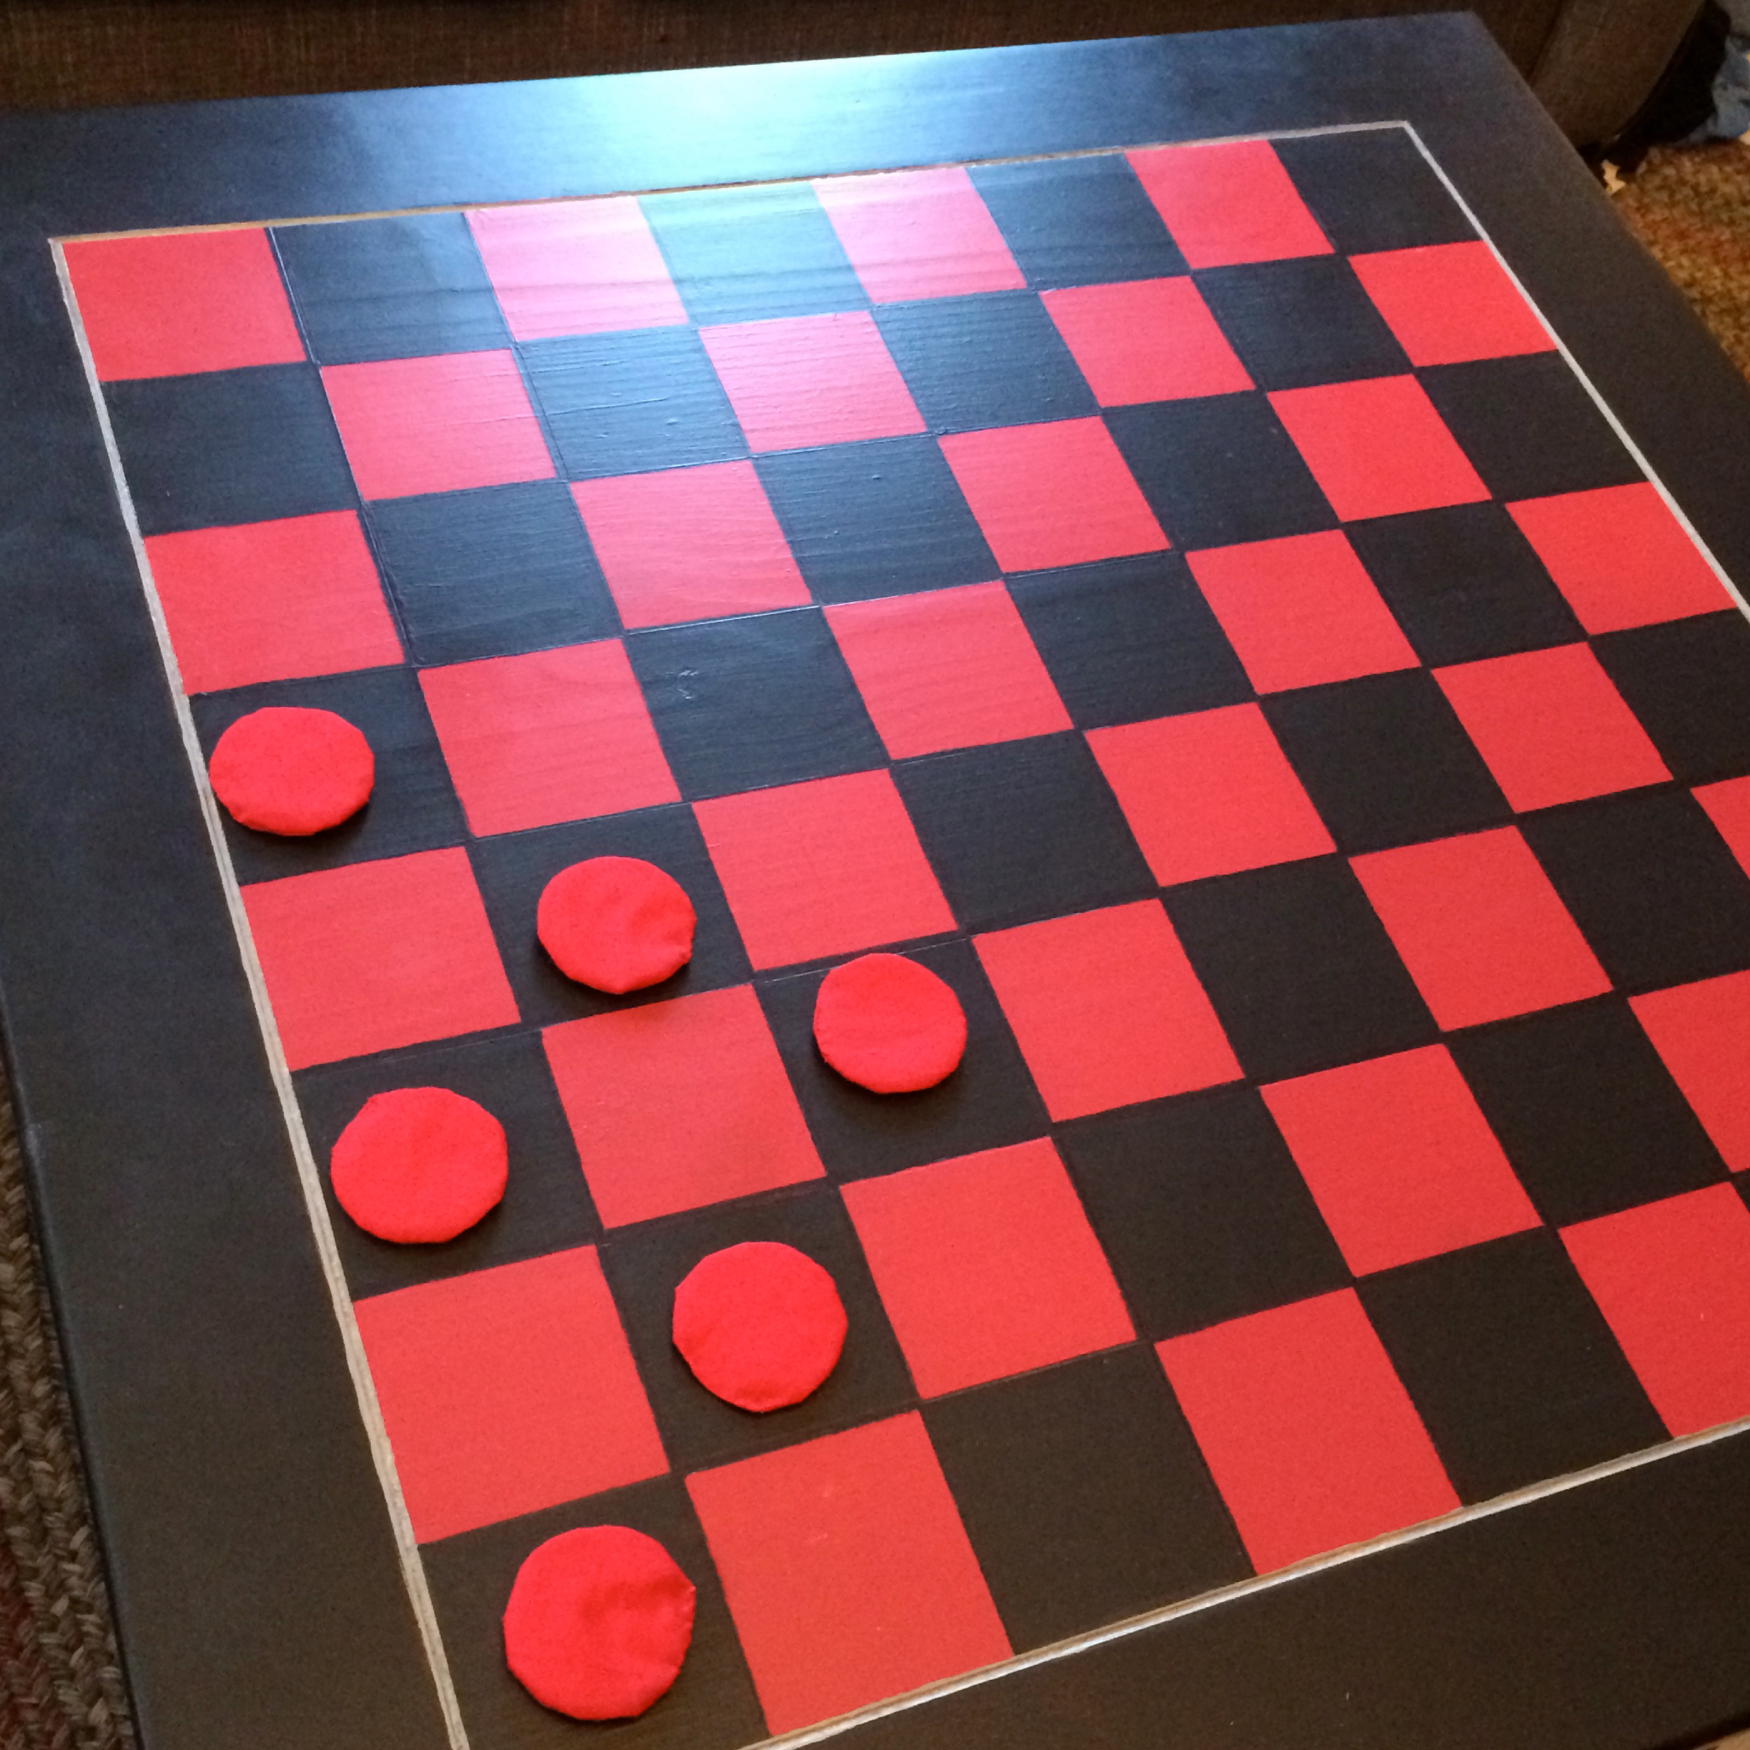
Checkers anyone?
Extra tips: Use a paint that already has primer in the mix, otherwise you’ll have to prime the surface before painting. I painted a pine table with knots so coverage was important. You might not need so many coats. Follow instructions on the paint and polyurethane regarding drying times. For example, the polyurethane I used required an extended drying time after the second and fourth coats. Advice from the Home Depot paint guy who sold me the paint: Don’t shake your can of polyurethane. Ever. Always stir. Shaking puts bubbles into the medium which are next to impossible to remove.
Questions about this project? Ask in the comments and I’ll try to help.